Registration & sing In | রেজিষ্ট্রেশন এবং সাইন ইন
To upload data in this website, you will need to register and sign in to the website. The Following is a guideline for doing that | এই ওয়েবসাইটে তথ্য প্রদান করতে হলে আপনাকে রেজিষ্ট্রশন এবং সাইন ইন করতে হবে। আপনারা অনুগ্রহপূর্বক নিচে বর্ণীত পদ্বতিটি অনুসরন করে করবেন।
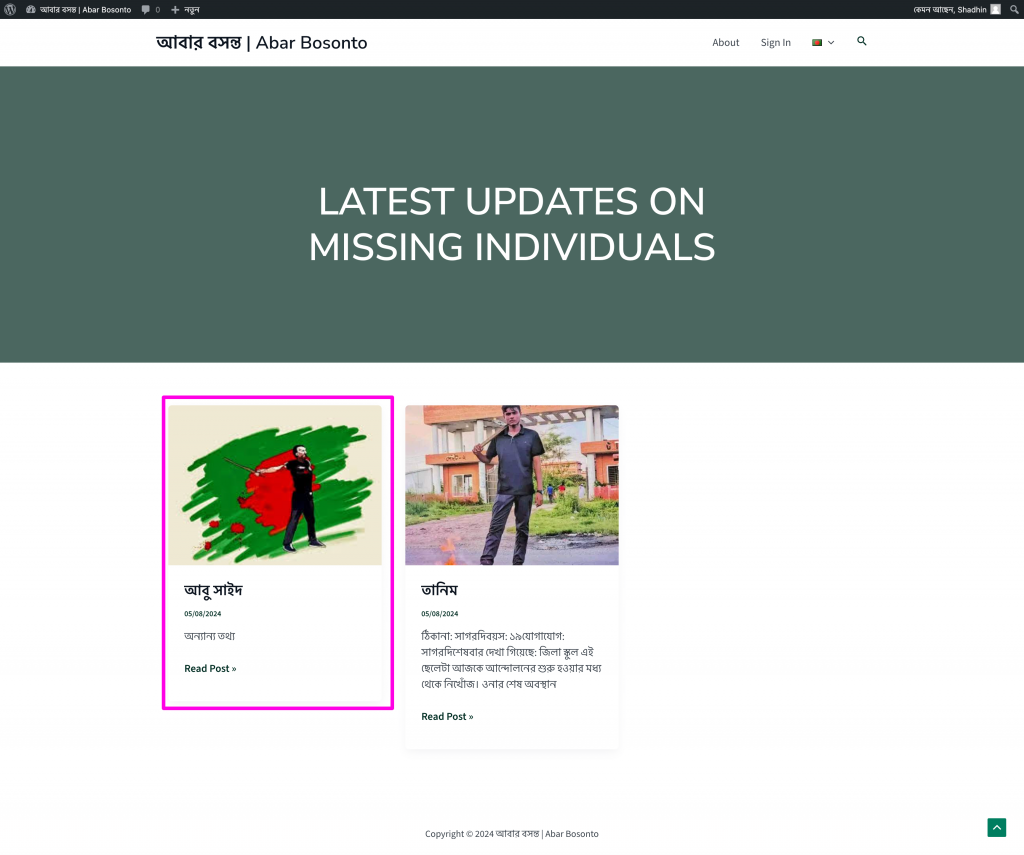
Step 01 | ধাপ ০১: Go to abarbosonto.com and from the menu, click on sign in | abarbosonto.com এ গিয়ে মেনুতে সাইন ইন লিংক-এ ক্লিক করুন।

Step 02 | ধাপ ০২ : You will see the Signing In page. In this page click on the register link. | আপনি সাইন ইন করার পাতাটি দেখতে পাবেন। এখানে রেজিষ্টার লিংক এ ক্লীক করুন।

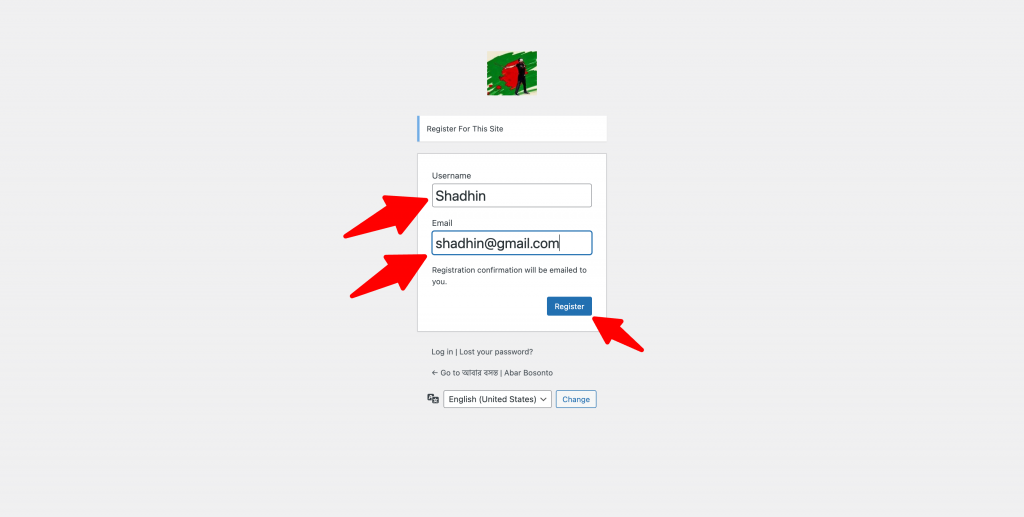
Step 03 | ধাপ ০৩ : Put in your chosen user name and email address. And then click register. | আপনার পছন্দের ইউজার নেম এবং আপনার ই-মেইল লিখুন। তার পরে রেজিষ্টার বাটনে ক্লিক করুন।
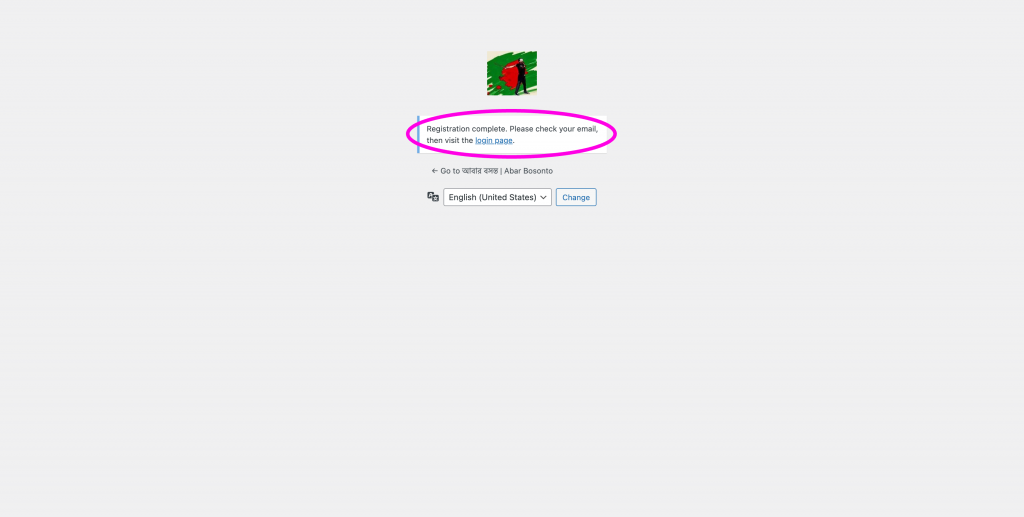
Step 04 | ধাপ ০৪ : An email will be sent to your email address. Please check inbox (and spam if not found in inbox). There will be email verification/password setting link from [wordpress] abarbosonto.com. | আপনার ইমেইল ইনবক্স এ একটি ইমেইল চলে যাবে। দয়া করে ইনবক্স (না পেলে স্প্যাম ফোল্ডার এ) দেখুন। সেখানে [wordpress] abarbosonto.com থেকে ইমেইল ভেরিফিকেশন/পাসওয়ার্ড সেট করার জন্য একটি লিংক থাকবে।
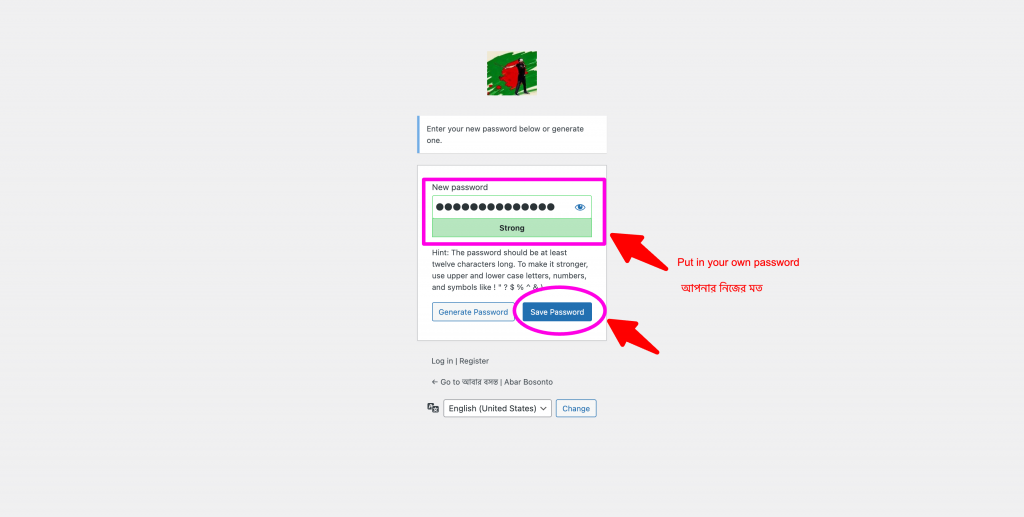
Step 05 | ধাপ ০৫ : After clicking password setting link, you will see this page. Please set your password. You can change the given password and set your own. | পাসওয়ার্ড সেটিং লিংক এ ক্লিক করলে এই পেজটি দেখতে পাবেন। দয়া করে আপনার পাসওয়ার্ড সেট করুন। যে পাসওয়ার্ডটি দেয়া থাকবে, সেটি পরির্তন করতে পারবেন।
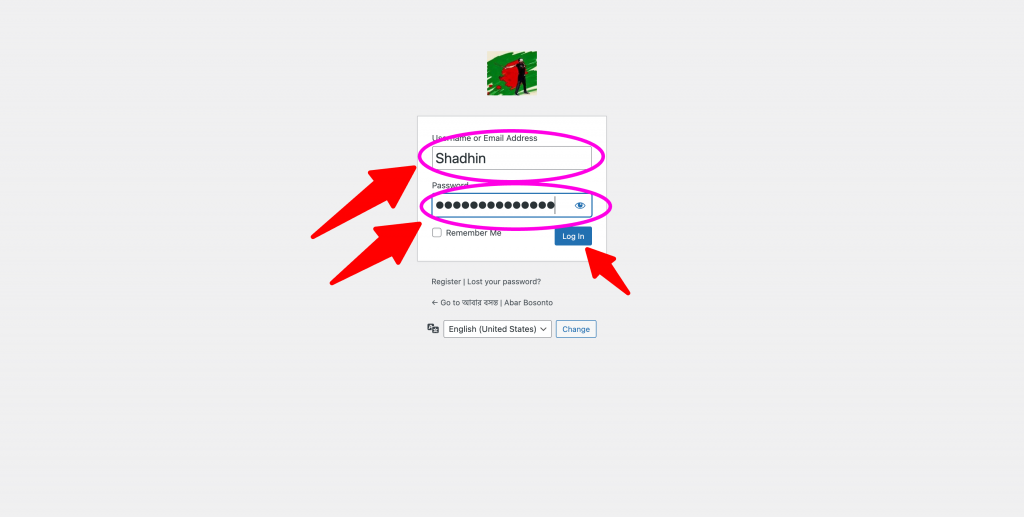
Step 03 | ধাপ ০৬ : After saving your password this page will come up. Please log in with your user name and password | পাসওয়ার্ড সেভ করার পর লগ ইন পেজ আসবে। আপনার ইউজার নেম এবং পাসওয়ার্ড দিয়ে লগ ইন করুন।
Create A Post (after logging in) | পোষ্ট তৈরি করুন (লগ ইন করার পর)
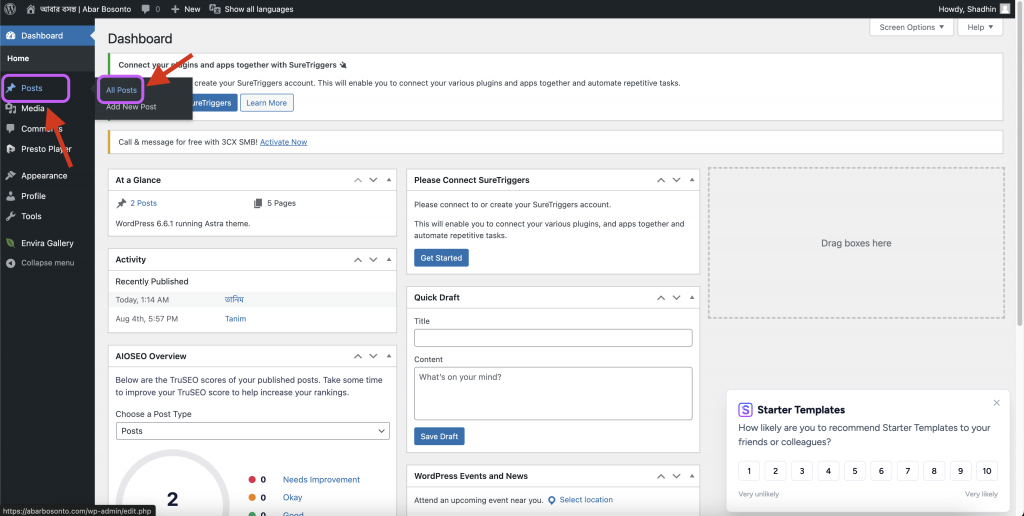
Step 01 | ধাপ ০১ : After loggin in, you will see this page. Click on Post (marked by red arrow) please. | লগ ইন করার পর এই পেজটি দেখতে পাবেন। পোষ্ট (লাল তীর চিন্হিত) লিংকে ক্লিক করুন।
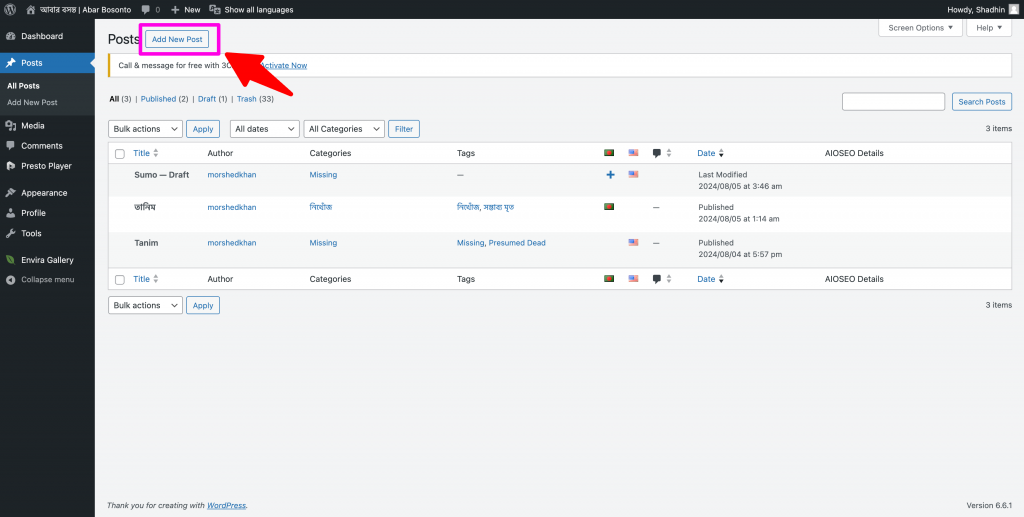
Step 02 | ধাপ ০২ : You will see all the posts. To create new post please click “Add New Post”. | আপনি সবগুলো পোষ্ট দেখতে পাবেন। নতুন পোষ্ট করার জন্য উপরে (তীর চিন্হিত) Add New Post বাটনে ক্লিক করুন।
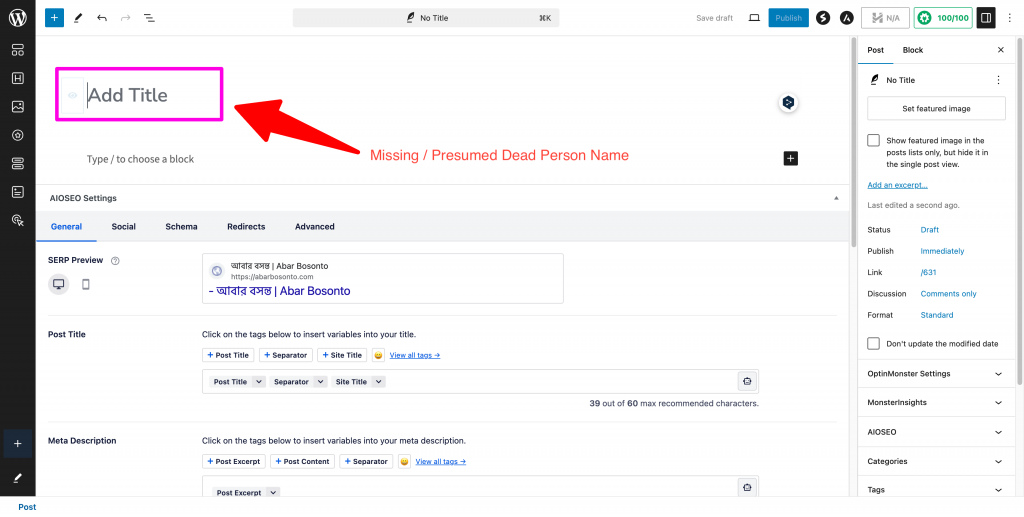
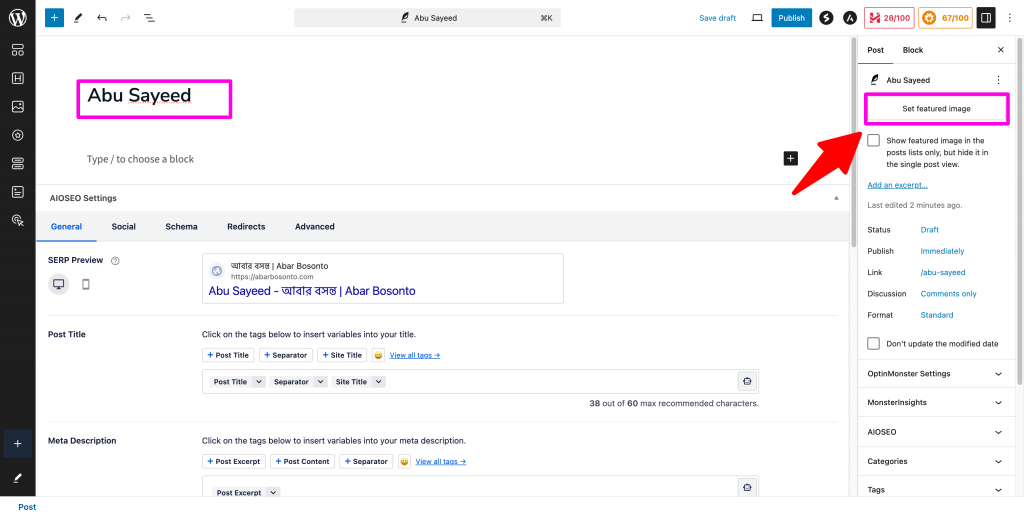
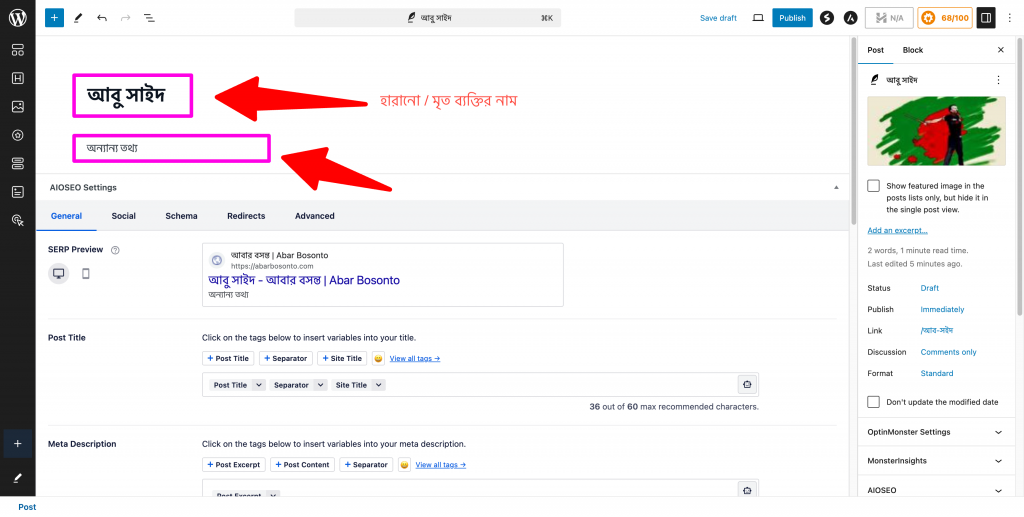
Step 03 | ধাপ ০৩ : In the place of “Add Title”, please type the missing/presumed dead/dead person’s name. | উপরের Add Title এর জায়গায়, নিখোঁজ/সম্ভাব্য মৃত/মৃত ব্যক্তির নাম লিখুন।
Step 04 | ধাপ ০৪ : After typing the name, click on the “Set featured image” (Arrow marked) button. | নাম লেখার পর ডান পাশে (তীর চিন্হিত) Set Featured Image বাটনে ক্লিক করুন।
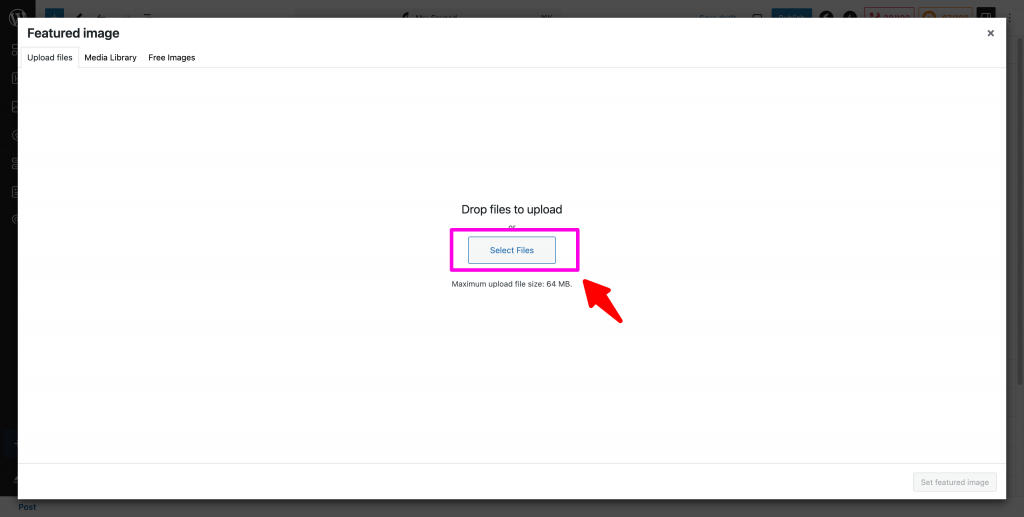
Step 05 | ধাপ ০৫ : You will see the following screen. Click on “Select Files” button (Arrow Marked). | এরকম একটি স্ক্রিন দেখা যাবে। Select Files বাটনটিতে (তীর চিন্হিত) ক্লিক করুন।
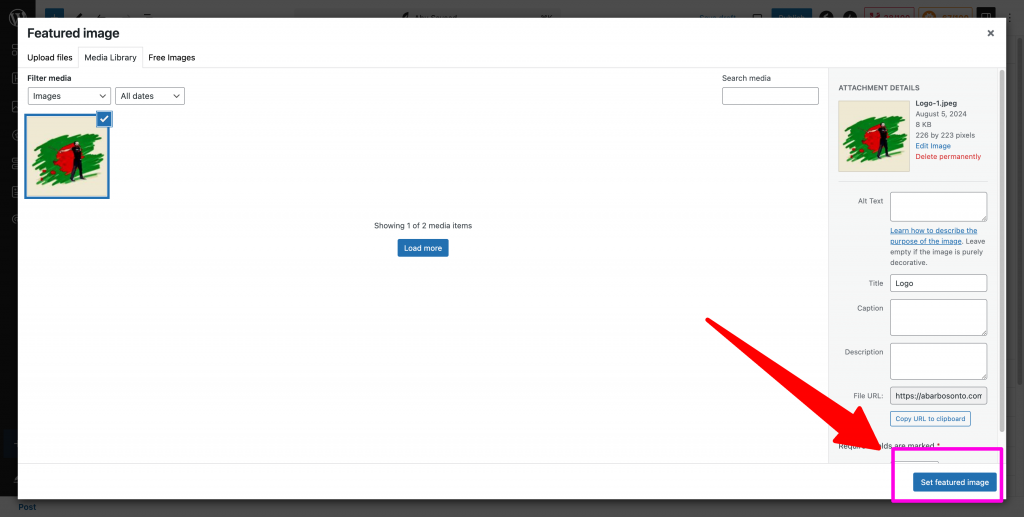
Step 06 | ধাপ ০৬ : Select an image from your computer storage or already uploaded images. And then click on the arrow marked button. | আপনার কম্পিউটার অথবা আপলোড করা ছবিগুলো থেকে ছবি সিলেক্ট করুন। তারপর তীর চিন্হিত বাটনে ক্লিক করুন।
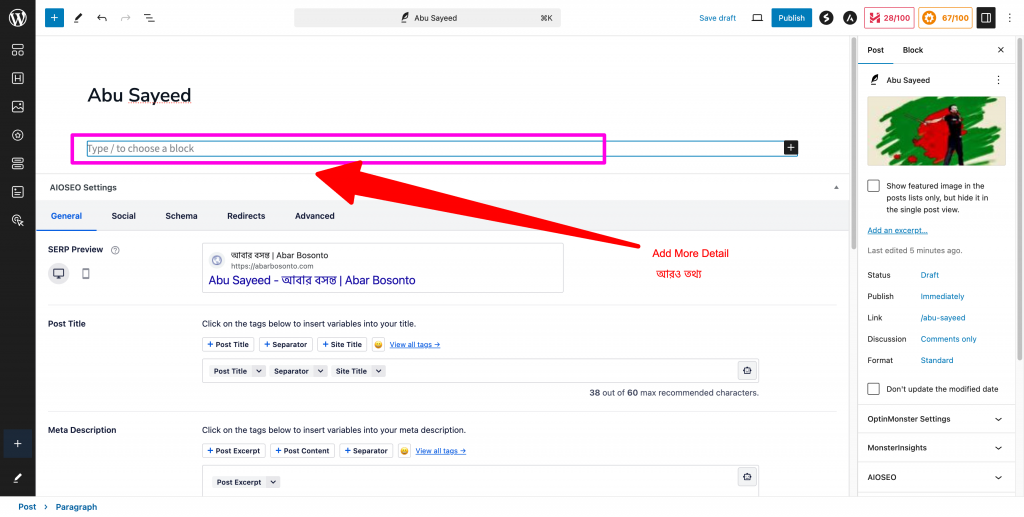
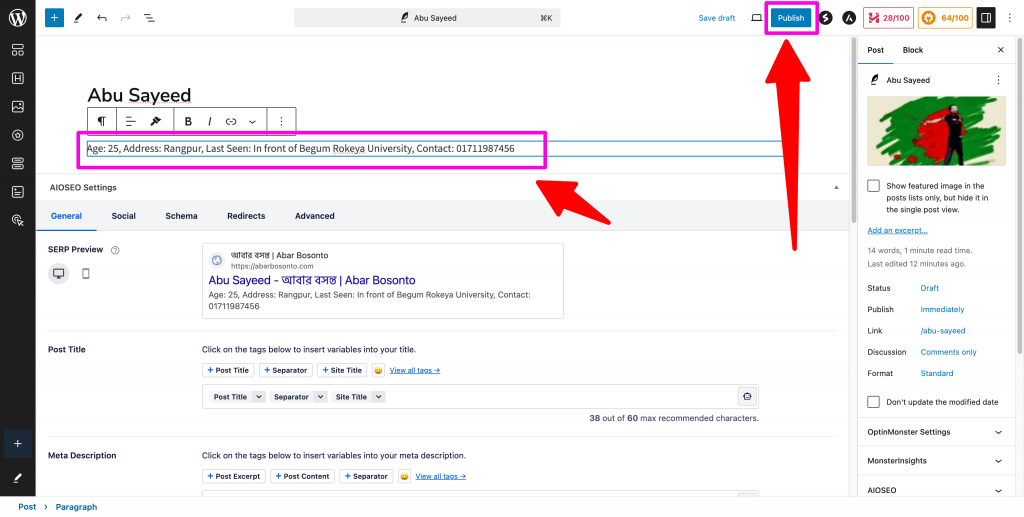
Step 07 | ধাপ ০৭ : Type in or paste (from copied detail) details about the person in the arrow marked box. You can select the box for typing by just clicking on that. | তীর চিন্হিত বক্স এ ব্যক্তিটির ব্যপারে বিবরন লিখুন অথবা লিখিত তথ্য কপি-পেষ্ট করুন। আপনি বক্সটির উপরে ক্লিক করেই সিলেক্ট করতে পারবেন।
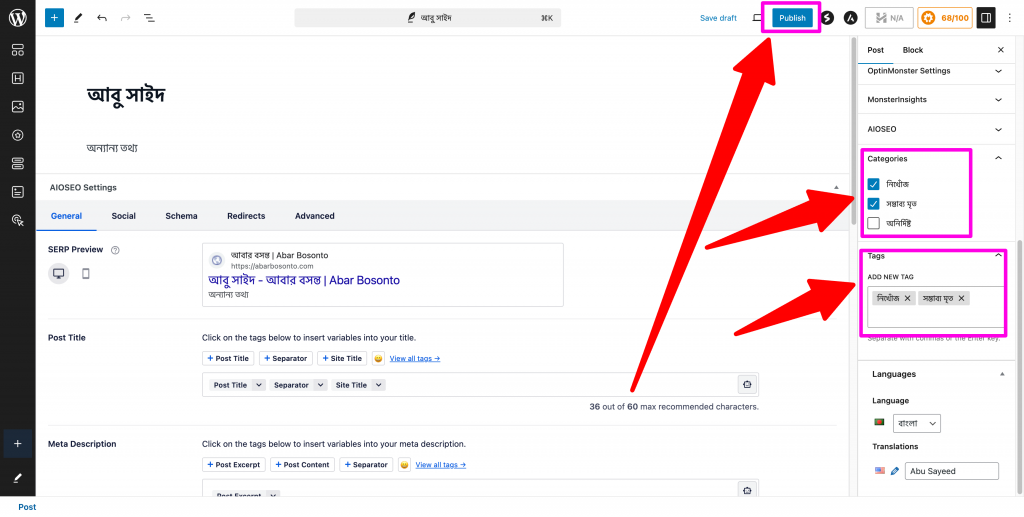
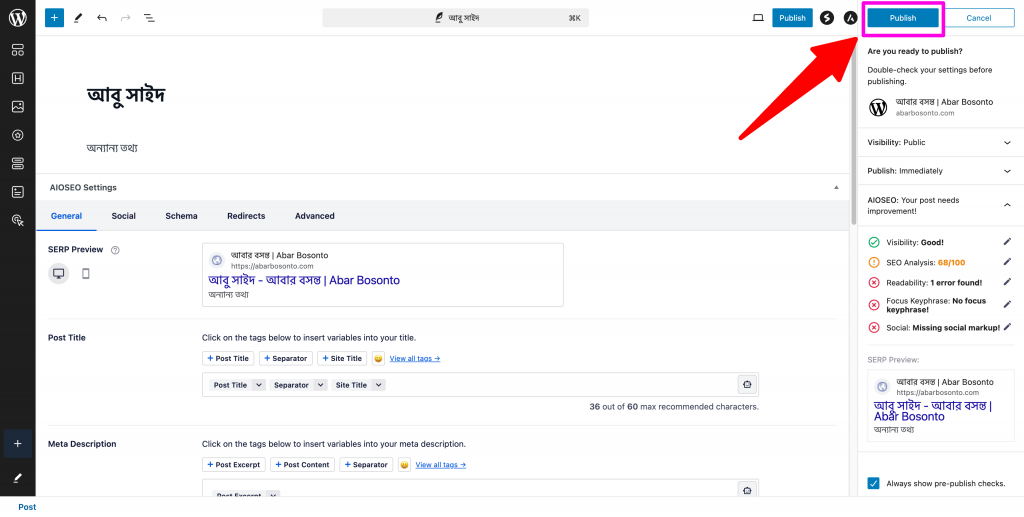
Step 08 | ধাপ ০৮ : After typing in the details, click the publish button (arrow marked). There will be another publish button shown right by the side. Click that as well (See step 04 of “Create A Post in Bangla” below). | বিবরন দেয়া হয়ে গেলে উপরের Publish (তীর চিন্হিত) বাটনটি ক্লিক করুন। পাশেই আরেকটি Publish বাটন দেখানো হবে। সেটিতেও ক্লিক করুন (নিচে “বাংলায় পোষ্ট তৈরি করুন” এর ০৪ নং ধাপটি দেখুন)।
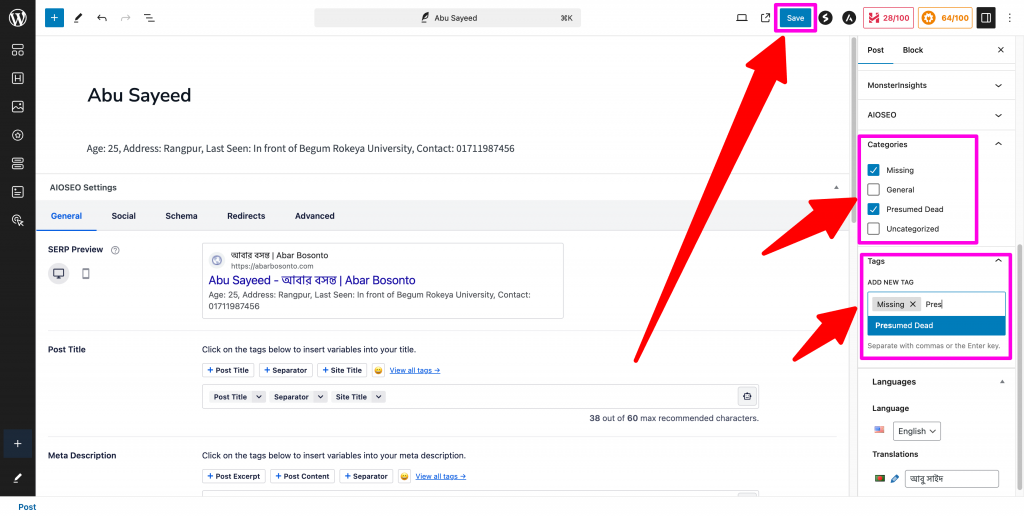
Step 09 | ধাপ ০৯ : In the right pane, there are two tabs, Post and Block. In the Post tab, you can scroll down and see categories and tag options for the post. Select all that apply, write tags and click save on top (marked by arrow) of the screen. | ডান পাশের পেনটিতে দুটি ট্যাব দেখা যাবে, Post এবং Block। Post ট্যাব এ স্ক্রল করে নিচের দিকে গেলে Categories এবং Tag দেখতে পাবেন। উপযুক্ত গুলো বাছাই করুন এবং ট্যাগ লিখুন। তারপর উপরের Save বাটন এ ক্লিক করুন।
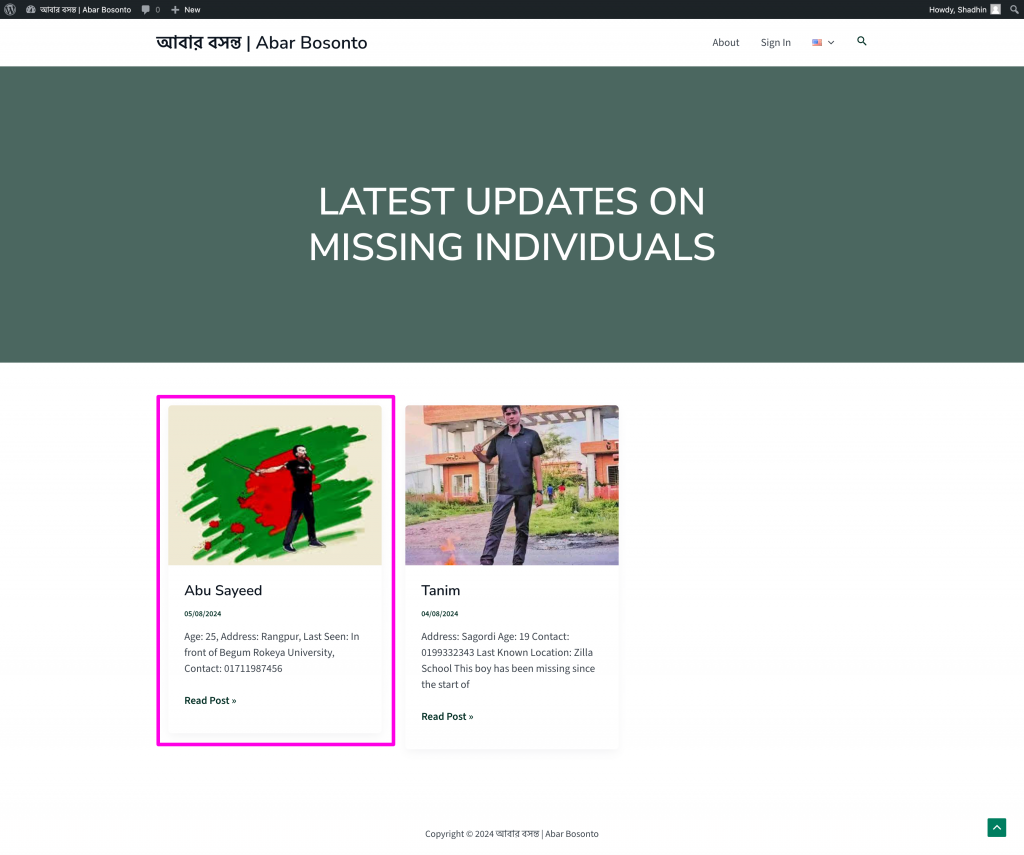
Step 10 | ধাপ ১০ : Check if your post is being displayed. | তারপর আপনার পোষ্টটি দেখা যাচ্ছে কিনা দেখুন।
Create A Post in Bangla (after logging in) | বাংলায় পোষ্ট তৈরি করুন (লগ ইন করার পর)
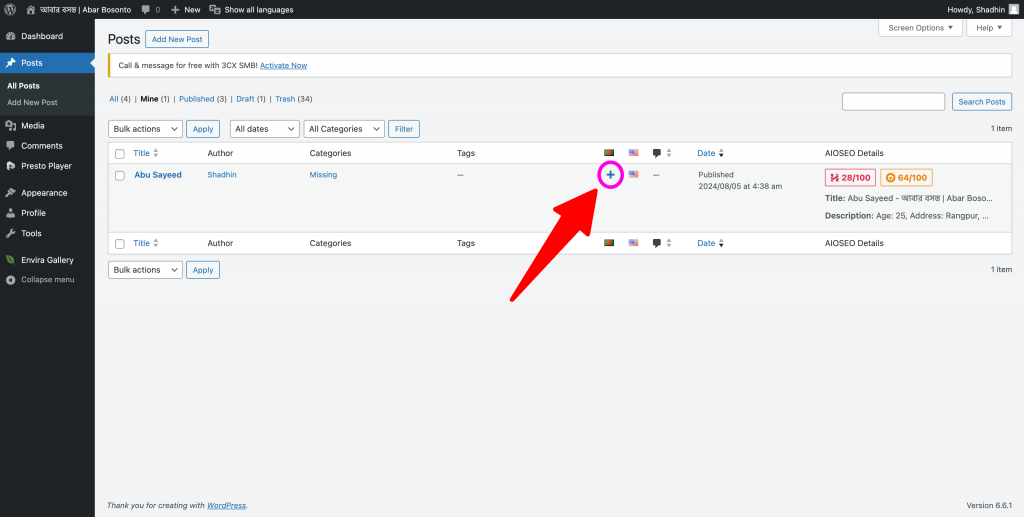
Step 01 | ধাপ ০১ : In all posts page, you will see a “+” sign in the Bangladesh flag column in the post you created. Click on the “+” sign. | সব পোষ্ট এর পাতায়, আপনার পোষ্ট এর লাইনে বাংলাদেশের পতাকার কলামে একটি “+” চিন্হ দেখা যাবে। “+” চিন্হটিতে ক্লিক করুন।
Step 02 | ধাপ ০২ : Just like in English, type in name and detail in Bangla. You do not have to give new image. | ইংরেজীর মত বাংলাতেও নাম এবং বিবরন প্রদান করুন। নতুন করে ছবি দেয়া লাগবে না।
Step 03 | ধাপ ০৩ : Just like the English post, select categories and tags. Then click on Publish button. | ইংরেজীর মত বাংলাতেও ক্যাটেগরি এবং ট্যাগ সিলেক্ট করুন। তারপর Publish বাটনে ক্লিক করুন।
Step 04 | ধাপ ০৪ : Click on the Publish button. | তীর চিন্হিত Publish বাটনটি ক্লিক করুন।
Step 05 | ধাপ 05 : Check your post. | আপনার পোষ্টটি দেখুন।